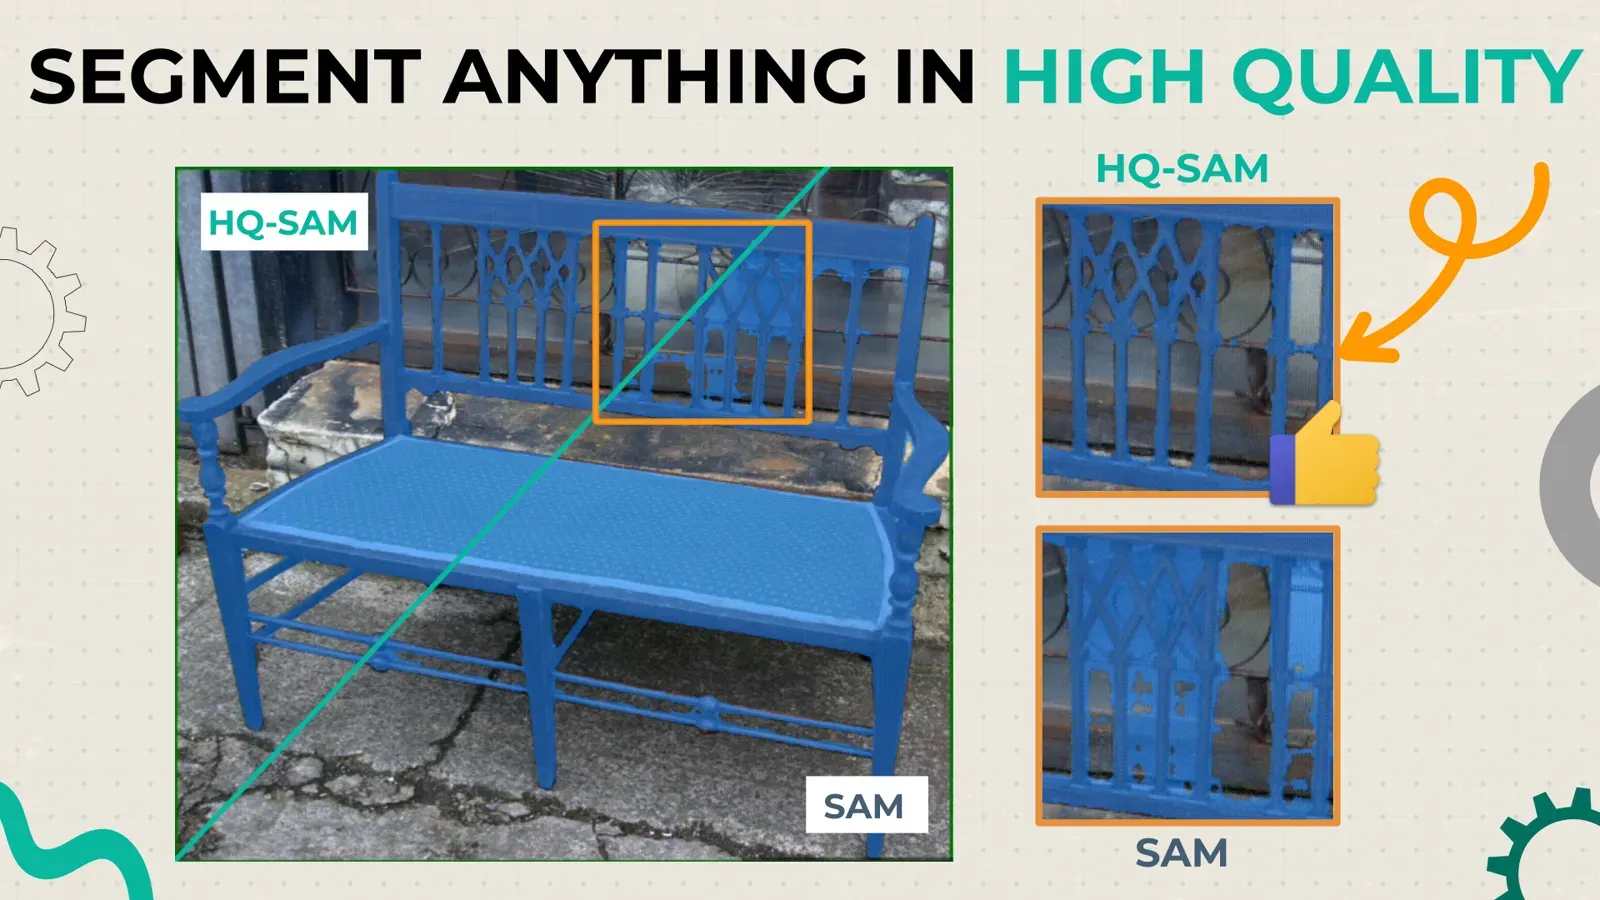

Image Matting: How to Create Alpha Masks With Matte Anything
 Almaz Gimaev
Image matting estimates partial transparency for each pixel. Learn to label alpha masks in Supervisely with Matte Anything pre-labeling and the Brush tool.
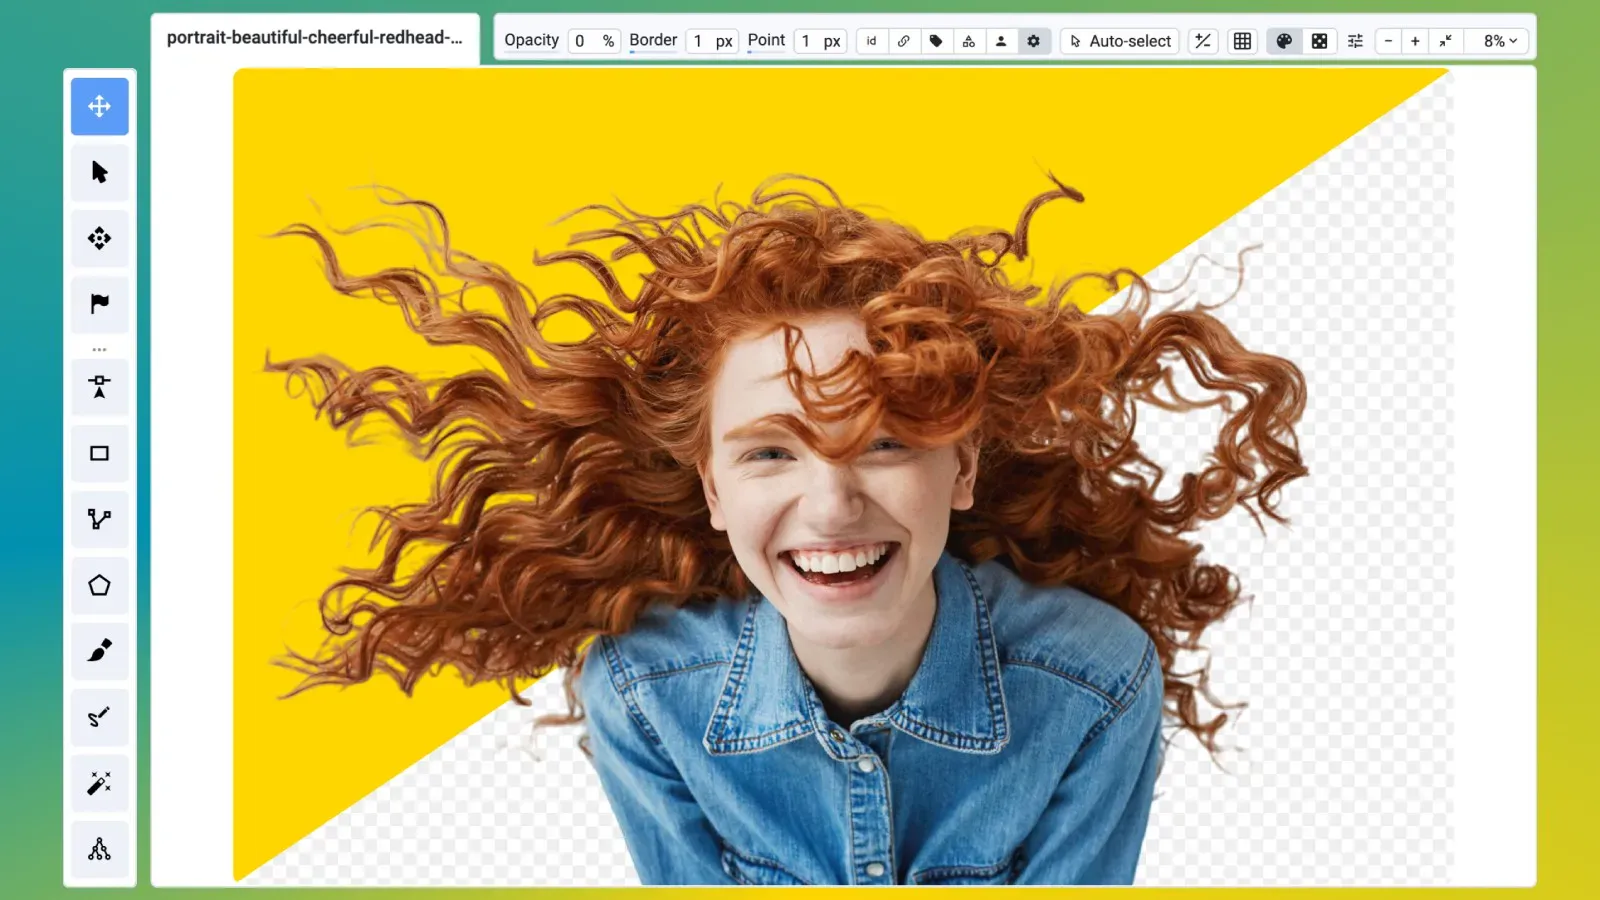
Image matting estimates how much of each pixel belongs to the foreground object, producing an alpha mask with partial transparency instead of a hard cut-out. This guide shows how to label images for matting in Supervisely, with the Matte Anything model for pre-labeling and the Brush tool, with opacity and hardness, for editing.
The workflow uses a labeling interface mode built for image matting and the Serve Matte Anything app, which combines several machine learning models to generate alpha masks. These parts of Supervisely make it work:
-
The Supervisely Image Labeling Toolbox supports a range of annotation types for different computer vision tasks. It has a labeling interface mode for image matting tasks. Learn more about other features in our Labeling Toolbox overview.
-
The updated Brush tool allows you to create and easily edit alpha masks for objects with additional features like
opacityandbrush hardness. Learn more about other features of this tool in our Brush Tool Overview. -
AI-Assisted Labeling with Smart Tool. You can use neural networks to speed up the annotation process and improve the quality of annotations.
-
Serve Matte Anything – Matte Anything model especially integrated into Supervisely for image matting tasks. Matte Anything combines several machine learning models to produce accurate alpha channels for images with high quality and simple user interaction.
Video Tutorial
Check out this 4-minute video guide to learn how to annotate images for image matting tasks in Supervisely. The video covers the following steps:
-
Creating a new project and importing images for image matting tasks
-
Matting objects using the Smart Tool with the Matte Anything model
-
Editing alpha masks with the Brush tool and adjusting opacity and brush hardness
-
Exporting annotated data
What is image matting?
Image Matting is the process of accurately estimating the foreground object in images and videos. This technique is crucial in image and video editing applications, especially in the creation of visual effects in film production. Unlike image segmentation, which divides an image into foreground and background by labeling pixels and results in a binary image where a pixel is either part of the foreground or background, Image Matting takes a different approach. In Image Matting, certain pixels may be part of both the foreground and background. These are known as partial or mixed pixels. To effectively separate the foreground from the background in an image, it's necessary to accurately estimate the alpha values for these partial or mixed pixels.
Most image matting algorithms aimed at predicting transparency map (alpha channel) based on a trimap - a specific mask that divides an input image into three types of areas: foreground, background, and transition region. Machine learning models usually take a trimap as input and try to estimate unknown values only in the transition region. However, the creation of the trimap can be quite time-consuming.

As shown in the image above, the trimap is a mask that divides an image into three regions: foreground (FG), background (BG), and unknown (UK). Algorithms based on the trimap need only to predict the unknown region. This reduces the algorithmic complexity but increases the interactive cost.
At the same time, many neural networks can produce accurate segmentation masks of objects on images - these masks can be used to generate trimaps automatically. Matte Anything, a combination of several machine learning models proposed by researchers from Huazhong University of Science and Technology, unites segmentation and matting models into a single pipeline to produce accurate alpha channels for images with high quality and simple user interaction.
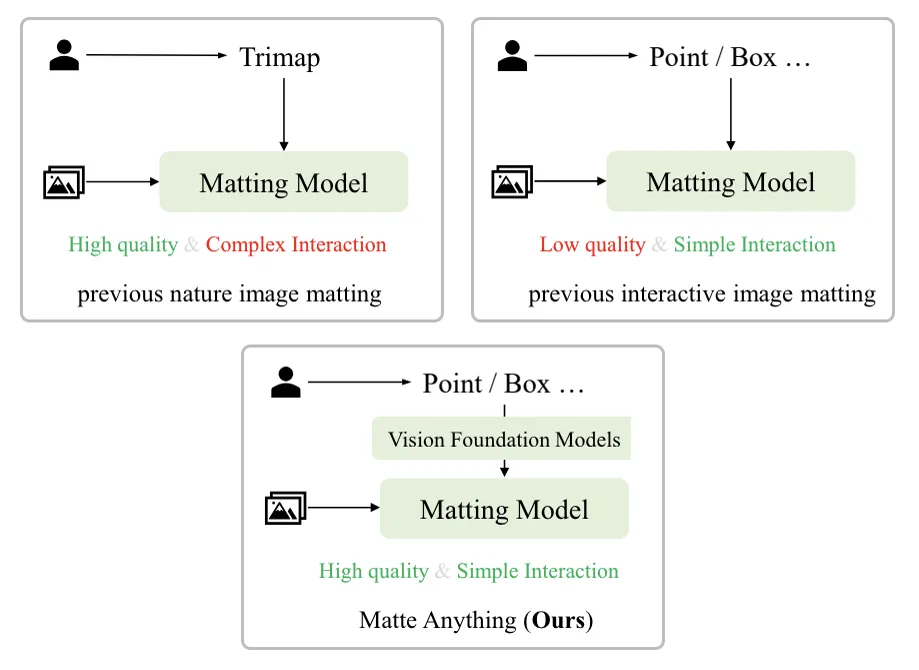 Model comparison
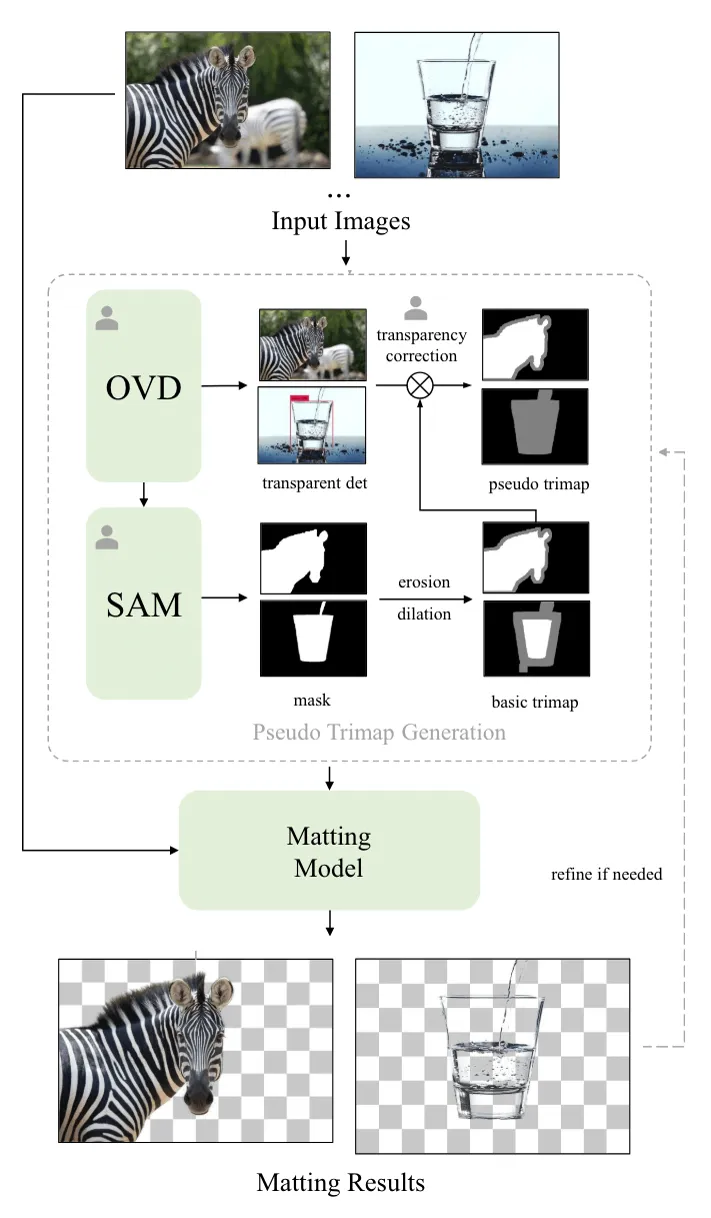
Matte Anything first employs the Segment Anything Model to generate a segmentation mask for the target object on an input image. Subsequently, the open-vocabulary object detection model (GroudingDINO) is used to detect commonly occurring transparent objects. Trimaps are then generated based on the segmentation and transparent object detection results, which are subsequently passed into the image matting model - ViTMatte.
What is image matting used for?
Here are some examples of use cases where image matting is essential nowadays:
- Special Effects in Films: Image matting is widely used in the film industry to create special effects and composite images. For instance, it allows filmmakers to seamlessly integrate actors into different scenes without requiring them to be physically present and to avoid dangerous situations or reduce costs.
- E-commerce: Accurate product extraction is essential for creating clean product images for online stores, improving the visual appeal of products. High-quality and attractive images can increase customer engagement and drive sales.
- Medical Imaging: In medical imaging, image matting aids in segmenting specific areas of interest, facilitating analysis and diagnosis.
Image matting vs image segmentation: what is the difference?
Segmentation labels each pixel as foreground or background, so the result is a binary mask. Matting allows partial pixels, which belong to both, so it keeps soft edges such as hair or transparent objects. The mask stores a transparency value for each pixel.
| Image segmentation | Image matting | |
|---|---|---|
| Output | Binary mask: each pixel is foreground or background | Alpha mask: a transparency value for each pixel |
| Edge pixels | Assigned to one side | Can belong to both foreground and background |
| Typical uses | Dividing an image into foreground and background | Visual effects, product cut-outs for e-commerce, medical imaging |
How do you annotate for image matting in Supervisely?
Let's walk through the process of annotating images for image matting tasks in Supervisely. We will cover how to create a new project with predefined settings for image matting, import data, annotate using manual and neural network-assisted methods, and export the annotated data. Additionally, we will explore how to activate the image matting labeling interface mode in an existing project and how to organize collaboration in labeling jobs.
Step 1. How do you import images for matting?
To start annotating images for image matting tasks in Supervisely, you need to create a new project and select the predefined settings for image matting. Here's how you can do it:
-
Click on the
New Project Wizardbutton in the main dashboard. -
Specify the project name and select the
Image Mattingoption from the list of predefined labeling interfaces. -
Upload the dataset you want to import. You can simply drag and drop the images or select other import options (e.g., from Cloud Storages, Team Files, etc.) and the import process will start automatically. You can upload images without annotations or images with annotations in Supervisely format. If you are importing images with annotations in Supervisely format, the Auto Import app will automatically detect the format and import the data into the project.
Short video on how to create a new project and import data:
That's it! Data is now imported into the project, and you are ready to start annotating images for image matting tasks in Supervisely.
Step 2. How do you draw alpha masks by hand?
Once you have imported the data, you can start annotating images for image matting tasks in Supervisely. As you can see, the labeling interface is divided into two parts: the main image with all annotations on the left and the alpha mask of selected objects on the right side.
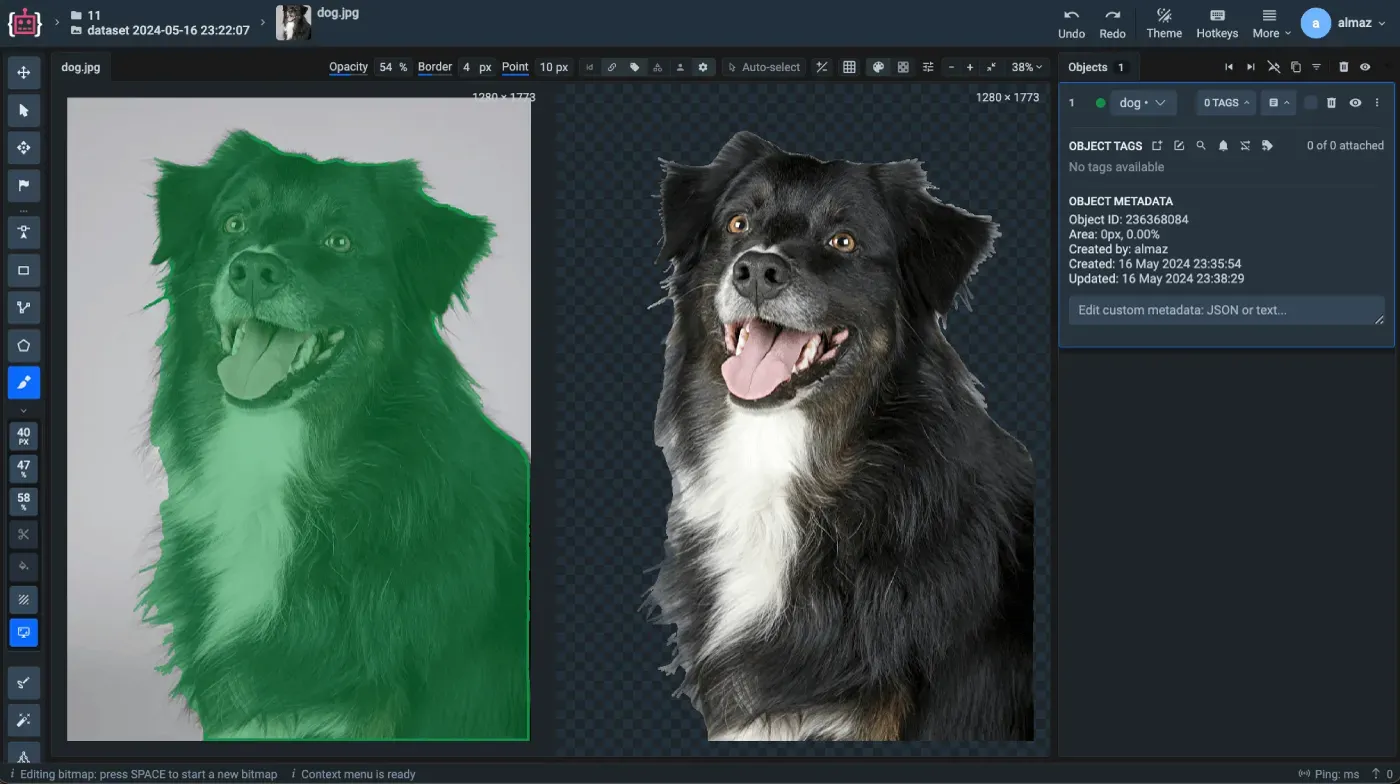 Interface overview
Follow these steps to manually annotate alpha masks:
Create a new class ➭ Select the Brush tool ➭ Start drawing the object
You can adjust the brush size, opacity, and hardness to create accurate alpha masks for objects and edit them as needed.
We have updated the functionality of the brush tool to be able to create alpha masks for objects with additional features like opacity and brush hardness. Using opacity, you can easily adjust the transparency of an object, and using hardness you can make the borders of the object more or less sharp.
Look at an illustrative example explaining opacity and brush hardness features:
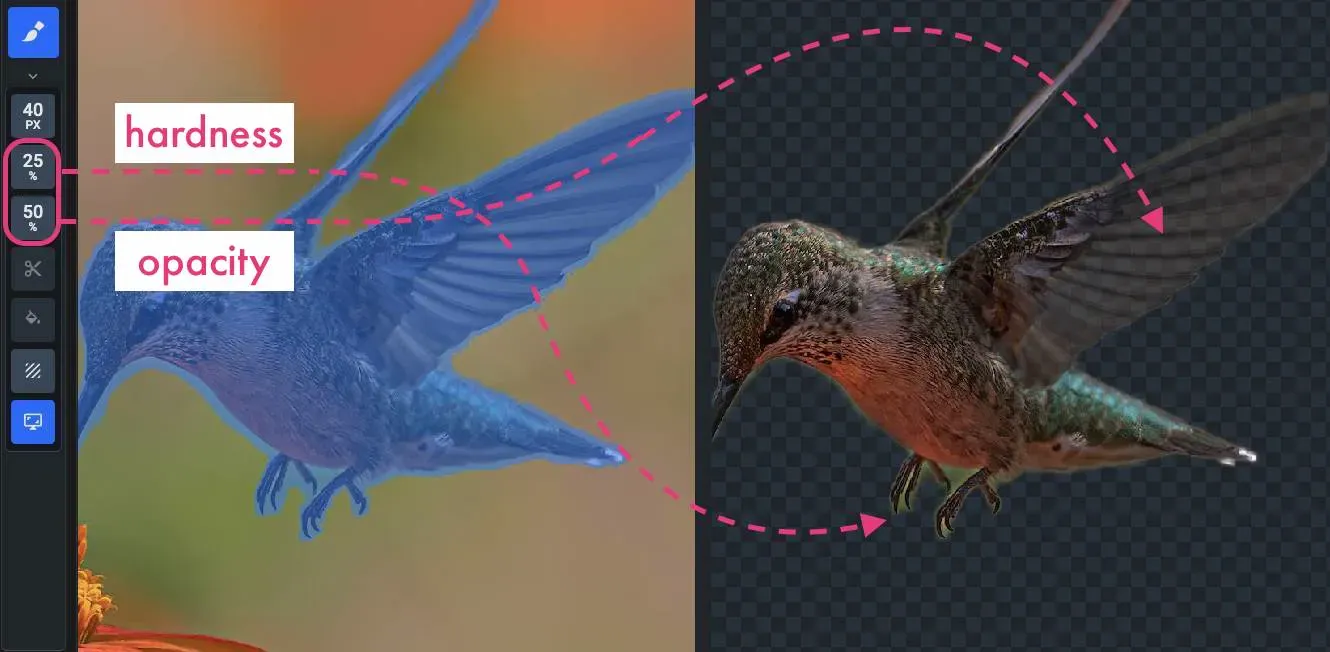 Brush tool's new features
Step 3. How do you prelabel with Matte Anything?
Combine the power of AI with manual annotation to speed up the image matting process. Connect your computer with GPU and utilize the Serve Matte Anything model for the Smart Labeling tool to improve efficiency. Check out our Smart Tool Overview to learn more about the AI-assisted labeling capabilities in Supervisely.

Serve Matte Anything
Deploy Matte Anything as REST API service
Let's see how the Matte Anything model can help you with image matting tasks in Supervisely. With just a few clicks, you can generate alpha masks for objects in images:
Model Inference Example:
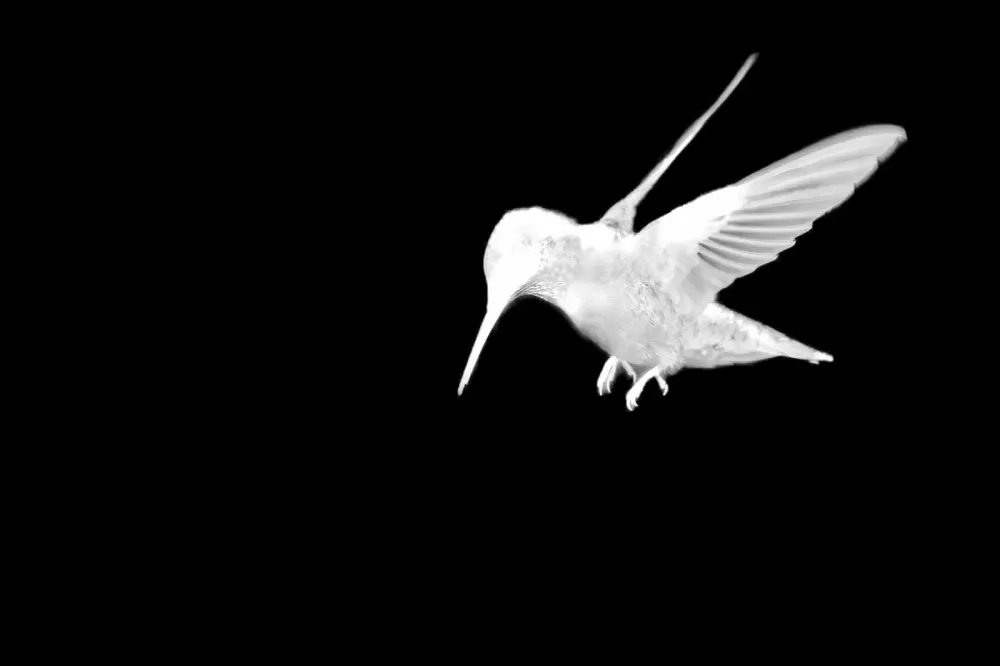

Brush Transparency: Tips and Tricks
Once you have labeled the object in the image, you can easily edit the alpha mask using the Brush tool. For example, you can adjust the opacity and brush hardness to refine the alpha values for the object. Here are some tips for using the Brush tool effectively:
-
Hotkey:
SHIFT+MOUSE WHEELto change the object's opacity and see every pixel of the object. -
Hotkey:
SHIFT+MOUSE CLICKto erase the mask. -
Use flexible brush size with zooming in and out to edit the alpha mask with precision.
-
Change the brush tool's hardness and opacity to edit the alpha mask with more control.
Look how you can edit the alpha mask using the Brush tool:
Step 4. How do you export matting results?
Once the labeling is complete, you can easily export your annotations in Supervisely JSON format. This format contains all the necessary information about the project, datasets, images, annotations, and metadata. Learn more about the Supervisely JSON format of Alpha Masks in our documentation.

Export to Supervisely format
images or audio and JSON annotations
At any moment, you can simply reimport your data back to the Supervisely platform and continue the annotation process. In the next step, we will show you how to upload alpha masks to Supervisely using the Supervisely Python SDK.
For Developers: Multiple Ways To Upload Alpha Masks
Even though it's a complex process to work with alpha masks, Supervisely provides streamlined workflows on how to upload alpha masks to the platform.
-
Upload a project in Supervisely JSON format using the Auto Import application
For most use cases, we recommend using our Auto Import application to upload alpha masks in Supervisely JSON format. It will automatically detect the format and import the data into the project. We have covered the process of importing data in the first step of this guide ⤴︎
-
Upload a project in Supervisely JSON format using the Supervisely Python SDK
To automate the process of uploading a project in Supervisely JSON format, you can use the Supervisely Python SDK. Here's an example of how to upload a project in Supervisely JSON format:
import supervisely as sly # ℹ️ Set up your credentials in the environment variables # https://developer.supervisely.com/getting-started/environment-variables api = sly.Api.from_env() sly_project_path = "path/to/sly_project" workspace_id = "123456" sly.upload_project(sly_project_path, api, workspace_id) -
If you already have created alpha masks generated using other tools (e.g. PNG alpha masks) you can easily upload them using the Supervisely Python SDK with just a few lines of code:
# Read alpha mask from PNG file
path_to_alpha_mask = "path/to/alpha_mask.png"
alpha_mask = sly.AlphaMask.from_path(path_to_alpha_mask)

# Create sly.Annotation with alpha mask
label = sly.Label(alpha_mask, object_class)
annotation = sly.Annotation(img_size=(image.height, image.width), labels=[label])

# Upload annotation with alpha mask to Supervisely
api.annotation.upload_ann(image_id, annotation)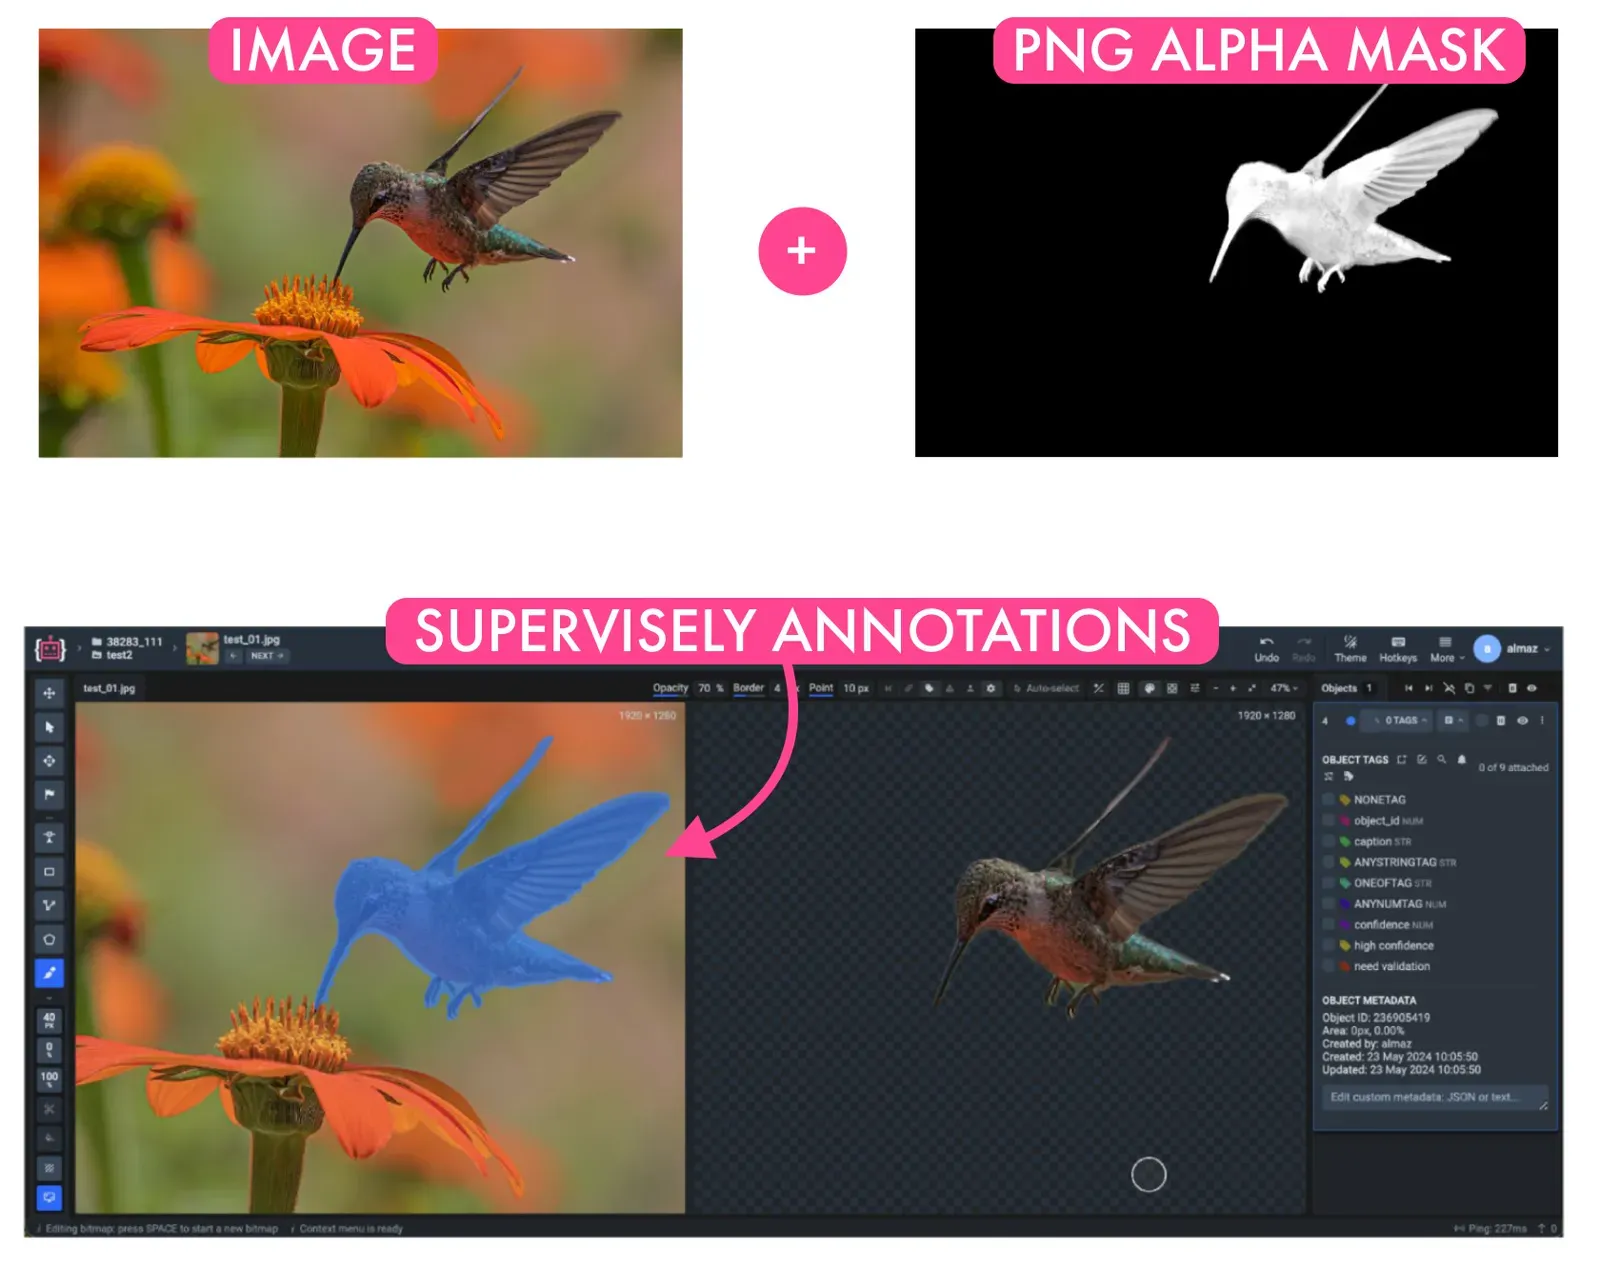
-
If you have your custom model to generate alpha masks for objects – deploy the model as a Serving App in Supervisely and use it for AI-assisted labeling. Check out our Complete Guide on how to integrate custom interactive image matting neural network into Supervisely platform
How to activate image matting mode for existing project
If you have an existing project and want to activate the special labeling interface mode for image matting tasks, you can do so through the project settings:
Settings ➭ Visuals ➭ Project labeling interface ➭ Image matting and click Save to apply the changes.
How to scale image matting annotation with a team
How else can you speed up the annotation process?
✅ Create a team, invite your colleagues to the labeling jobs, and work together on the same project.
Check out our blog posts on how to effectively perform annotation at scale using Labeling Jobs, Labeling Queues and Labeling Consensus approaches.
Labeling Jobs and other collaboration tools in Supervisely helps to organize efficient work and complete tasks like:
-
Job management - the need to describe a particular task: what kind of objects to annotate and how
-
Progress monitoring - tracking annotation status and reviewing submitted results
-
Access permissions - limiting access only to specific datasets, classes, and tags within a single job
-
What's more, you can take a screenshot for urgent tasks without using additional apps and quickly share the link.
Summary
Whether you are working on special effects in films, e-commerce product images, or any other industry that requires accurate object extraction, Supervisely provides a streamlined workflow for efficient image matting annotation and extraction of objects from images.
In this guide, we have covered the step-by-step process of the image matting task in Supervisely. We also introduced the new labeling interface mode for image matting tasks with the updated Brush tool and the Matte Anything model for AI-assisted labeling.
Frequently asked questions
What is image matting?
Image matting is the process of accurately estimating the foreground object in an image or video. Some pixels, such as soft edges, belong to both foreground and background, so matting predicts a transparency map (alpha channel) instead of a binary mask.
What is the difference between image matting and image segmentation?
Segmentation labels each pixel as foreground or background, giving a binary mask. Matting allows partial pixels that belong to both, so the result keeps soft edges and transparency.
What is a trimap?
A trimap is a mask that splits an image into three regions: foreground, background and an unknown transition region. Many matting models take a trimap as input and predict values only for the unknown region. Making trimaps by hand takes time.
What is Matte Anything?
Matte Anything combines several models. Segment Anything makes a segmentation mask, GroundingDINO detects transparent objects, trimaps are built from those results, and ViTMatte predicts the alpha channel. In Supervisely it runs as the Serve Matte Anything app.
How do I edit an alpha mask in Supervisely?
Use the Brush tool. Adjust its size, opacity and hardness. SHIFT + mouse wheel changes the object opacity, and SHIFT + click erases the mask.
How do I switch an existing project to image matting mode?
Open Settings, then Visuals, then Project labeling interface, choose Image matting and click Save.